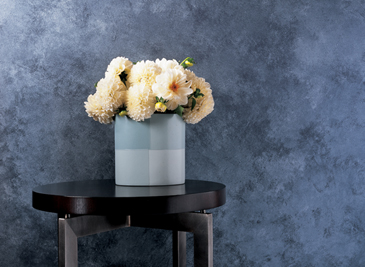
Sponging paint is one of the easiest techniques to master – and can give your walls the delicate, mottled look of aged porcelain, as well as the dramatic look of rustic stoneware.
Sponging On (Additive Method)
Step 1 – Prepare Your Walls
When sponging your walls or other surfaces, be sure they are properly prepared before you begin. Clean your walls thoroughly and repair any protruding nails or other imperfections.
For the best results, we recommend Fresh Start® 100% Acrylic Primer (023) before you apply your base color. Be sure to tape off any edges you wish to protect, such as those along ceilings, windows, and doors.
Step 2 – Prepare the Glaze Mixture
Mix together one gallon of Studio Finishes® Latex Glaze (405) with one quart of Regal® Matte Finish 221 with Advanced Particle Technology™ in the color you have selected.
You can also use any other interior paint from our Regal product line, using the same ratio – four parts glaze to one part paint. Ensure that the glaze and paint are thoroughly mixed, and pour the mixture into your paint tray.
Step 3 – Apply the Glaze
Dampen a sea sponge with water, and wring out excess water until the sponge is only slightly damp.
Dip the sponge into your glaze mixture, dabbing off any excess glaze onto craft paper. Starting in an upper corner, lightly dab color in a random pattern on your wall. Keep the painted areas about 12 inches apart from one another, filling an area about four feet by four feet.
Without adding more glaze to your sponge, fill in the areas in between your initial applications.
Helpful Hints:
For better control, work from your wrists, not your elbows.
The sponging paint technique can be used in corners, too. Just use small pieces of sponge cut to expose a flat edge.
Remember to step back and look at your work frequently, to make any needed adjustments.
Sponge Painting: Sponging Off (Subtractive Method)
Step 1 – Prepare Your Walls
Whether you’re using the sponging painting technique on your walls or another surface, be sure that it’s properly prepared before you begin. Clean your walls thoroughly and repair any protruding nails or other imperfections.
For the best results, we recommend Fresh Start 100% Acrylic Primer (023) before you begin applying your base color. Be sure to tape off any edges you wish to protect, such as those along ceilings, windows, and doors.
Step 2 – Prepare the Glaze Mixture
Mix together a half-gallon of Studio Finishes Latex Glaze (405) with a half-gallon of Studio Finishes Latex Glaze Extender (408). Once they are mixed together, add in one quart of Regal Paint, Matte Finish (221) with Advanced Particle Technology.
The glaze extender allows you more “open time” for your glaze mixture, and keeps it wet and workable longer. For longer open time, add more glaze extender to the mixture.
Step 3 – Apply the Glaze
Starting in an upper corner, use either a brush or roller to apply your glaze mixture in sections about two feet by two feet. Work from the ceiling toward your floor.
Use a clean, dampened sea sponge to pull the glaze color off your wall, taking care to rinse it with clean water and wring frequently.
Be sure to maintain a wet edge as you glaze, to prevent any hard lines from forming on your wall as you work from one section to another.
Tools and Supplies
Paints:
-
Regal Matte Finish 221 with Advanced Particle Technology
Studio Finishes Latex Glaze (405)
Studio Finishes Latex Glaze Extender (408) (recommended for all subtractive techniques)
Tools:
-
3/8-inch nap Benjamin Moore roller
Disposable latex gloves
Drop cloth
Natural sea sponge
Benjamin Moore nylon/polyester brush
Paint tray
Painter’s tape
Water for cleanup
Helpful Hints:
-
For a hint of depth, use a glaze color in the same color family no more than two shades deeper than your base color.
For a bolder look, select one or more glaze colors from different color families.
Note: Furniture in Sponging Off photo courtesy of Dennis Miller Studios

